How to Make a Chatbot in Python Using RL3

This article describes how to build a simple chatbot using Python and RL3. In this effort we are not going to use any specialized platforms, any available python chatbot frameworks or chatterbot engines. We will create a core of our Python chatbot from scratch in order to demonstrate how simple and fun this task can be.
The only thing required for building a chatbot is basic knowledge of Python, plus we also assume that you have completed the instructions from the RL3 Installation Guide. Before you continue on through this tutorial, please make sure you have a Linux machine with Python 3 installed.
What is a Chatbot?
A chatbot is a computer program or a service that conducts a conversation via chat interface. It can be designed to simulate human behavior in a small-talk conversation session, or to serve practical purposes like online sales, customer service, promotion, etc. In other words it is a computer program with a natural-language user interface. Examples of chatbots include: a personal assistance bot, scheduling bot, news and weather bot, personal finance bot, etc.
How Chatbots Work
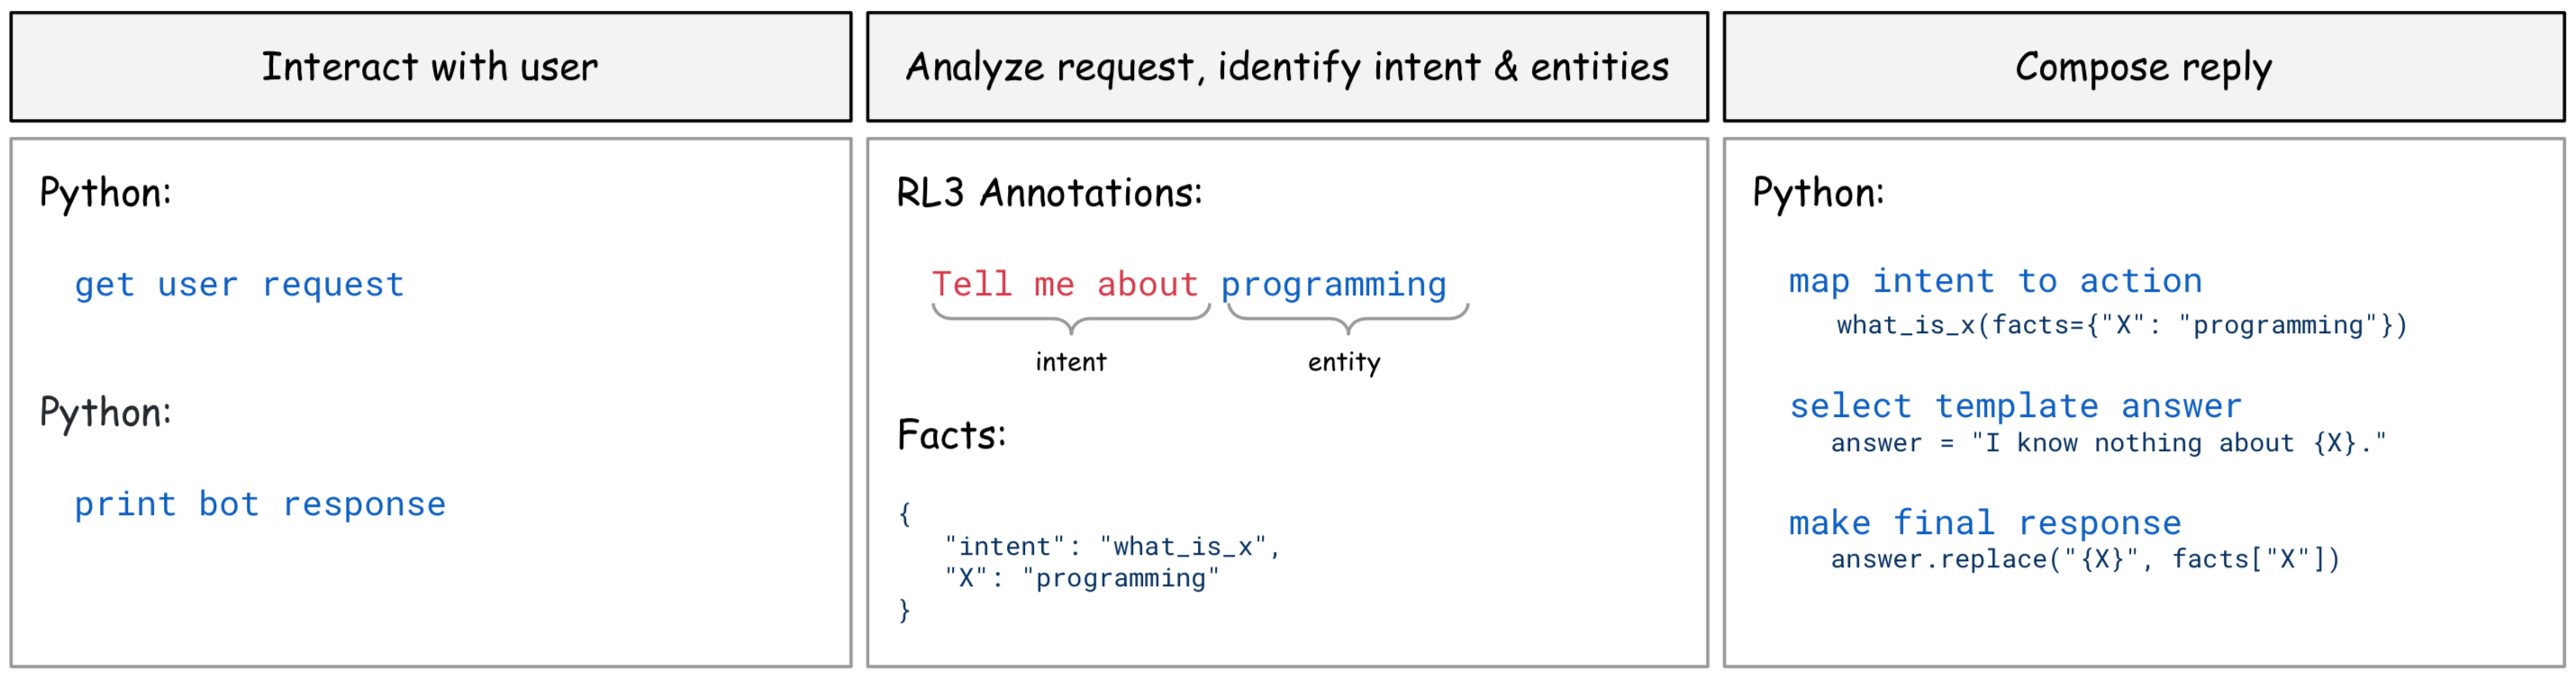
Chatbots may have a very complicated architecture utilizing rule-based models, artificial intelligence and machine learning techniques. They can also be as simple as a lookup of keywords. Regardless of internal implementation, all chatbots have a similar anatomy and are based on the following loop:

At the core of any chatterbot there is an ability to analyze a request in order to identify the user's intent and extract relevant entities contained in it. In many cases intents can be directly mapped to some action logic and corresponding entities will serve as inputs to this logic.
The Interact with user and Compose reply steps can be as simple as a text console input/output and a list of predefined responses associated with the known intents. In more advanced chatterbots the interaction interface may be connected to a messaging platform and may include text-to-speech and speech-to-text components, while the answer composition logic may utilize generative NLP models.
"Hello World" Chatbot in Python
Let's build a simple Python chatterbot which covers the following scenarios:
- Bot name will be Talkbot
- When a user types hello (or hi, etc), the bot responds Hello!, or Hi there!, or Hi.
- When a user types goodbye (or bye, or stop, etc), the bot responds Goodbye, or Bye-bye and stops the conversation.
- When a user types what is your name? (or tell me your name, etc), the bot responds My name is Talkbot, or Call me Talkbot.
- When a user types the bot's name, the bot responds Yes?
- When a user types what is {X} (or tell me about {X}, etc), the bot responds I know nothing about {X}, where
{X}is any word or phrase used by a user in the input (except the phrase your name). - In any other case the bot responds {X}?, where
{X}is the user input.
On a high level, the logical structure of our chatbot will be as follows:
The user interaction and response composition logic will be implemented in Python. Natural language processing (identifying intents and entities) will be implemented in RL3.
The "interact with a user" part is as trivial as "get a user request from the console" and "print the bot's response".
The NLP part is also simple due to usage of built-in RL3 StdLib patterns. An RL3 program (model) will consist of annotation rules - one rule per each intent. The input will be a factsheet containing user request and some background knowledge such as the bot's name. The output will be a factsheet containing annotated intents with weights (or confidence scores) and sub-facts such as entities.
The "compose reply" part is also very simple. Here we will walk through the identified intents and map them to the predefined actions which is as simple as a lookup of member functions in the Actions class. So, we will have one action function for each intent. Each action function will contain a list of predefined answer templates. One template will be picked randomly and the final answer will be composed from it by replacing fact mentions with corresponding values (background facts such as bot name, or annotated entities).
Analyze a request, identify an intent & entities
We will use a simple RL3 model to analyze a request and identify an intent and entities. It is expected that the user input will be provided as a fact with a text label. Detected intent will be asserted as a fact with an intent label.
Let's create a file intent.rl3 with the following content:
include <phrases.rl3>
This will include a phrases.rl3 module from the RL3 StdLib library which defines a lot of useful conversational patterns and discourse markers such us {HELLO}, {GOODBYE}, {WHAT_IS} and the like.
annotation
    intent="hello" [weight="1"]
search text
    \<{HELLO}\>
if
    true
This block defines an annotation rule for an intent hello. Note that the StdLib pattern {HELLO} will match phrases like hello, hi, hola, konnichiwa and other.
annotation
    intent="goodbye" [weight="1"]
search text
    ^({GOODBYE}|stop|quit|done|exit)$
if
    true
This block defines an annotation rule for an intent goodbye. In addition to the StdLib pattern {GOODBYE} (which matches phrases like goodbye, see ya, and sayounara), this rule will match such phrases as stop, quit, done and exit.
annotation
    intent="what_is_your_name" [weight="1"]
search text
    \<{WHAT_IS_YOUR_NAME}{EOS}
if
    true
This block defines an annotation rule for an intent what_is_your_name. Like other StdLib patterns, this pattern matches many variations of the target phrase.
annotation
    intent="bot_name" [weight="1"]
search text
    ^(?i:{ref last bot_name}){EOS}
if
    true
This block defines an annotation rule for an intent bot_name. It is expected that the bot name will be provided as a fact with a bot_name label. The annotation rule is using an RL3 built-in pattern ref which matches the value of the provided fact in the target text.
annotation
    intent="what_is_x" [weight="0.1", X=x]
search text
    \<{WHAT_IS} {x=[^!\.\?]+}{EOS}
if
    true
This block defines an annotation rule for an intent what_is_x. This rule is using an RL3 built-in pattern = which matches the given pattern and captures it under the given name. In our case it matches any word or phrase following {WHAT_IS} and captures it as a temporary fact with an x label. Having been matched, the captured phrase is asserted as the output fact X (by the X=x part in actions block - for more details on annotation rules syntax refer to RL3 Language documentation).
Also, pay attention to the weight="0.1" part - it instructs the engine to assert the weight 0.1 to the main fact (intent). It is important as we have 2 rules in our code with a probable intersection point: what_is_your_name (the preceding rule) and what_is_x (this rule). Both rules may match the same phrase. For instance, your name in what is your name can be a part of {WHAT_IS_YOUR_NAME} as well as {x=...} following {WHAT_IS}. In our case the what_is_your_name rule is more specific, so we assign a higher weight to it.
annotation
    intent="default" [weight="0.01", X=x]
search text
    ^{x=[^!\.\?]+}{EOS}
if
    true
This block defines an annotation rule for an intent default which matches any word or phrase and asserts it as the output fact X. The main fact intent will be asserted with the lowest weight 0.01.
The final RL3 model can be compiled with the following command:
$ rl3c -m ./intent.rl3 -o intent.rl3c
Interact with a user, compose a reply
Now, let's develop a Python part of our chatbot. Create a file chatbot.py with the following content:
import random, re, rl3
This block imports all the required packages.
class Answer():
    def __init__(self, message=None, stop=False):
        self.message = message
        self.stop = stop
This block defines an Answer class.
def substitute(text, factsheet):
    t = text
    for i in factsheet.get_facts():
        t = t.replace('{%s}' % i.get_label(), i.get_value())
    return t

def make_answer(templates, subfacts, context):
    random.shuffle(templates)
    for i in templates:
        try:
            t = substitute(i, subfacts)
            t = substitute(t, context)
            if re.search(r"{[a-zA-Z0-9_\-]+}", t) is None:
                return Answer(message=t)
        except:
            pass

    return None
This block defines helper functions used to compile an answer from the provided templates by replacing known fact mentions with corresponding values. For instance, the context factsheet corresponds to the bot's background knowledge and will contain the fact bot_name. The subfacts factsheet contains facts asserted as part of an annotation rule and may contain a fact X in case of annotations such as default and what_is_x. So, the function make_answer can compile templates like My name is {bot_name} or {X}? to the final responses.
class Actions():
    def __init__(self):
        pass

    def bot_name(self, w, subfacts, conclusions, context):
        return Answer(message="Yes?")

    def goodbye(self, w, subfacts, conclusions, context):
        return Answer(message=random.choice(["Goodbye.", "Bye-bye."]), stop=True)

    def hello(self, w, subfacts, conclusions, context):
        return(make_answer(["Hello!", "Hi there!", "Hi."], subfacts, context))

    def what_is_your_name(self, w, subfacts, conclusions, context):
        return make_answer(["My name is {bot_name}.", "Call me {bot_name}."], subfacts, context)

    def what_is_x(self, w, subfacts, conclusions, context):
        return make_answer(["I know nothing about {X}."], subfacts, context)

    def default(self, w, subfacts, conclusions, context):
        return make_answer(["{X}?"], subfacts, context)
This block defines an Actions class containing logic associated with intents. In our case the logic for each intent is very simple - it just selects a random template from the corresponding list of template answers and compiles it to the final response.
class Chatbot():
    def __init__(self, name):
        self.name = name
        self.actions = Actions()
        self.engine = rl3.RL3Engine()
        self.engine.load('./intent.rl3c')

    def get_intents(self, fs):
        intents = [(i.get_value(), i.get_weight(), i.get_factsheet() if i.has_factsheet() else None) for i in fs.get_facts('intent')]
        return sorted(intents, reverse=True, key=lambda x: x[1])

    def process(self, user_input, context):
        try:
            facts = self.engine.create_factsheet_from_json(context) if context else self.engine.create_factsheet()

            # reset 'bot name' fact
            facts.retract_facts('bot_name')
            facts.assert_simple_fact('bot_name', self.name)

            # reset 'user input' fact
            facts.retract_facts('text')
            facts.assert_simple_fact('text', user_input)

            conclusions = self.engine.create_factsheet()
            self.engine.run(facts, conclusions)
            for name, weight, subfacts in self.get_intents(conclusions):
                action = getattr(self.actions, name, None)
                if action is not None:
                    answer = action(weight, subfacts, conclusions, facts)
                    if answer:
                        facts.retract_facts('prior_intent')
                        facts.assert_simple_fact('prior_intent', name)
                        return (answer, facts.to_json())
        except:
            pass

        return (Answer(message='ouch...'), context)
This block defines a Chatbot class.
The __init__ function initializes our chatbot.
The get_intents function extracts intents from output factsheet and sorts them by weight in the descending order.
The process function executes an intent model on the user input and the background facts (such as bot_name) and walks through the identified intents. It tries to find and execute a corresponding action for each intent. When it succeeds, it stops the loop and returns the answer.
And the final block (a chatbot core loop) is as follows:
chatbot = Chatbot('Talkbot')

print('Bot: Hello!\n')
user_input = ''
context = ''
while True:
    user_input = input('You: ')
    answer, context = chatbot.process(user_input, context)
    print('Bot: %s\n' % answer.message)
    if answer.stop:
        exit(0)
This block creates a chatbot instance, initializes it with the name Talkbot, and runs an infinite loop:
get input
process request
print response
Now, let's compile an intent model and test our chatbot:
$ rl3c -m ./intent.rl3 -o intent.rl3c
Parsing module '"./intent.rl3"'...

$ python3 ./chatbot.py
Bot: Hello!

You: hi
Bot: Hi there!

You: what is your name?
Bot: Call me Talkbot.

You: Talkbot
Bot: Yes?

You: what is world?
Bot: I know nothing about world.

You: stop
Bot: Bye-bye.
The source code for this chatbot example (both Python and RL3 part included) can be found on RL3 GitHub for the Python chatbot project in the RL3 Examples Repository (/tasks/simple-chatbot/ folder).